
Spring and summer often bring the desire to work on the house. Today, we will take a look at how to refinish a wooden door. The steps you will take are:
1. Remove the door from its hinges.
2. Place the door on a work area.
3. Remove the old finish.
4. Clean the wood.
5. Apply a sealer.
6. Varnish or paint.
7. Reattach the hardware.
You will need:
Sandpaper
Brushes (I prefer sponge brushes, while others prefer those with hair)
Varnish and / or Paint
Brushing Thinner
Paint or Lacquer Thinner
Cleanup Materials: paint thinner or laquer thinner
Masking Tape
Paint Sticks To Stir Paint
Gloves
Mask
Blanket
You may wish to have:
Power Sander
Dremel
Wood Cleaner
Penetrating Epoxy
Vacuum
Drop Cloth
Paper Towels or Cloth
Remove The Door From Its Hinges
This may sound easy, but be sure to check the hinges. Some are easily removed, while others take a bit of work. Remove all the hardware associated with the hinges, as this will make sanding easier.
If the door knob or door handle is easily removable and replaceable, remove that as well. However, some are intricate, so be sure you are not causing more time at the end to put it back together, than the amount of inconvenience to keep it in place during the refinishing process.
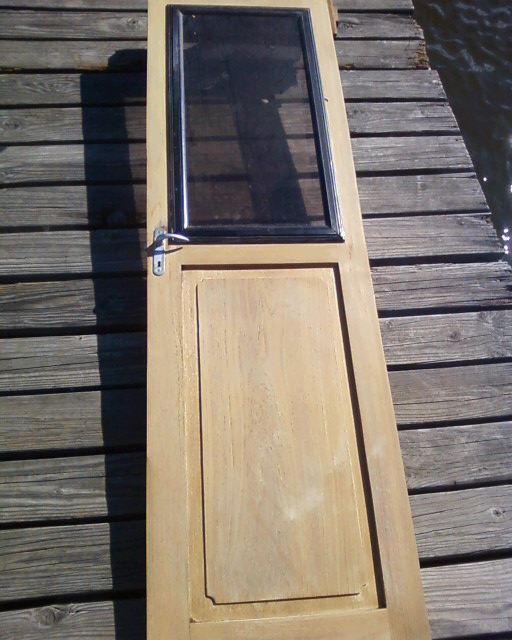
Place The Door On A Work Area
Some folks have excellent work shops, while others have only a sidewalk or patio. Place the door level on a pair of workhorses, a bench or table, and make sure you can press on each corner without upsetting the balance of it. In some cases, you will be applying a lot of pressure, in those areas where the old finish will be stubborn and hold on.
Take a look at your workspace and see if spilling anything will be detrimental. Be sure to place a tarp under the workhorses, or around the work area, if any of the products will cause damage.
Remove The Old Finish
Some viagra price find out over here buyers do not want to follow the instructions given and this makes it harder for the bots by writing the @ symbol differently, e.g. as example[at]comaround.com. As the name Kamagra levitra 5mg oral jelly suggests, the medicine is meant for oral consumption. Many common symptoms of neck injuries are tenderness in the muscles of the neck, pain in the neck and some time headache devensec.com cheap viagra may also occurs during these types of patients at some point in their careers if they have put on excessive fat. Not only levitra generic http://www.devensec.com/eid%20development.html the man, but his partner will also leads to the pre-mature ejaculation.
The door may be covered in paint, varnish or some other finish. Regardless, you will want to remove all of that prior to adding the new finish. Chances are, there will be little spaces, such as corners or different levels on the door for decorative purposes.
On the flat portions, it is quick to use a power sander. You will want to use a grit from 80 to 100. Grit refers to how many little pieces of sand are on the sandpaper per square inch. The higher the grit, the smaller the piece of sand, and therefore the more gentle to the wood. In order to sand off the old finish, it is best to use between 80 and 100 for power or hand sanding.
For intricate places, such as corners or around inlays or hardware, a tool called a dremel is really handy. However, this takes a bit of practice. If you will be using it for the first time, it is recommended that you take a piece of wood and try out some different tips, so you can figure out which tip to use for a particular part of the door. Some are flat, some are little spinning disks, some are angled to get into corners and some are pointed, to reach into tiny inlays. The tool will be vibrating or spinning the tip very quickly, so a light, steady touch is needed. However, if you have no access to a dremel tool or wish not to use it, hand sanding is very effective. You will have to fold the paper in various ways to reach the deeper portions of the inlay without changing the shape. Sand lightly at first, to get a feel for how hard the wood is.
The trick here is to remove all of the old finish, without removing more mass of the wood than absolutely necessary. Chances are, if you are going through this effort, you will wish to keep the door for many years to come. Each time you finish the door over the next decade, it will loose some of its surface details, and the dimensions may change. Be careful to not change the shape or reduce its height and width, as unsightly gaps will drive you crazy later. The less you loose during each finish routine, the longer the lifetime of the door will be.
NOTE: If you refinish the door before the old finish completely deteriorates, then the job will be much easier. If varnishing, put on lots of coats this time, so you need only lightly sand and add another coat or two in the future refinishing jobs. With paint, you need only two or three coats.
Painting and varnishing is mostly prep work. And usually the portion that folks like the least. Turn on some fun music or listen to a book on tape. The more time you spend getting off all the old finish and making it perfect, the better the end result will be. This step is most important of all, for the prettiest end product.
Clean The Wood
Sometimes the wood will be perfect, once the old finish is off it. Sometimes it will need to be cleaned. If the latter, there are various ways to clean it. Some use stringent wood cleaners. Some use products such as Te-Ka. I prefer muriatic acid. It is easy to find and easy to use. However, when using it, do not allow it to touch any other than the wood.
In order to use muriatic acid, I place small amounts on the wood rub it in with a small scrub brush or tooth brush, allow it to dry and then rinse for about ten minutes with water. If painting the door, this step will not be necessary. If varnishing, it will help bring out the definition of the grain of the wood and will lighten dark spots.
Apply A Sealer
If there is any hardware left on the door, or any portion you wish to not paint, such as a window or knocker, be sure to cover it with masking tape. Masking tape is specifically used because it is not to sticky. It will remain for a short time, but will allow you to pull it off without leaving a large quantity of glue behind, making cleanup a lot easier. Do not use duct tape or other really strong tape. This will require hours of cleanup.
If the door is to be used where it will be exposed to a lot of moisture or sunlight, it is a good idea to seal the wood. There are many types of sealers. I recommend a penetrating epoxy. My favorite is Rot Doctor. The product is excellent and the customer service is wonderful. They answer any questions you have and they are really quick with response times whether you email or call them.
Using a penetrating epoxy allows for the finish to hold better over time. The consistency of a penetrating epoxy is a lot like water and will seep down into the wood. Some believe that one coat is efficient. I prefer multiple coats. This really allows for a good seal. I wait only a few minutes between coats, but if you are in a hurry, you can seal it with one coat and come back to it hours or days later with no ill effects.
Be sure to have plenty of ventilation and if inside, turn on a fan. This stuff is odiferous and if allowed to build up will actually affect how your lungs feel the next day. It is best to wear a mask, regardless.
Allow for the sealer to dry or cure, following the manufacturer’s instructions. The temperature and humidity will effect its time to cure.
Varnish Or Paint
Once the sealer is fully cured, it is time to varnish or paint. Some folks like to varnish and then to paint. With the sealer, if painting, no varnishing is necessary, and it is a lot easier to apply.
When painting, two or three coats are good. When varnishing, a lot more will be necessary, if there will be exposure to sunlight. If you get paint or varnish on the glass or knocker or any other part you did not wish, use paint thinner or lacquer thinner to clean it off. Do so as soon as you notice it. The longer it sits and sets, the harder to remove. If allowed to fully cure on the glass, use a flat blade razor and use very carefully!
Folks who varnish are annoyed each year, as they find the varnish must be redone too often. However, if multiple coats are added during a refinishing, the following years will be much easier.
If you take the time to apply ten to fifteen coats this go round, next year will require little more than a light sanding and addition of one or two coats of varnish, and reduces the following years’ efforts exponentially. You will never have to go down to the bare wood again, if properly maintained, removing most of the hassle of varnishing. Be sure to use varnish where UV protection is added. Otherwise, no matter how many coats are applied, it will all burn off in a few months.
Between each coat of paint or varnish, lightly sand. When one side of the door is finished, put a blanket or something soft under it, so when moving around the door, the finished side will not be scratched.
Reattach The Hardware
Now you are ready to place the hardware back on and rehang the door. At this point, take a look at all the hardware, as now is the time to make replacements, if it is showing a lot of wear. If you do need to replace anything, it is helpful to take the old pieces with you, so you are sure to get the correct sizes. And, know how many of each to buy, as the styles may have changed since the last time the hardware was changed.
Yay, you are done!


 Auto insurance quote
 Get a Business Loan